
Before you even begin working on your design, it is a good idea to decide what size paper you plan to print it on. Designs need to be arranged and created accordingly to ensure optimal resolution and overall balance of the final product, which can change depending on the dimensions.
There are so many different paper sizes, it is easy to become confused and overwhelmed.
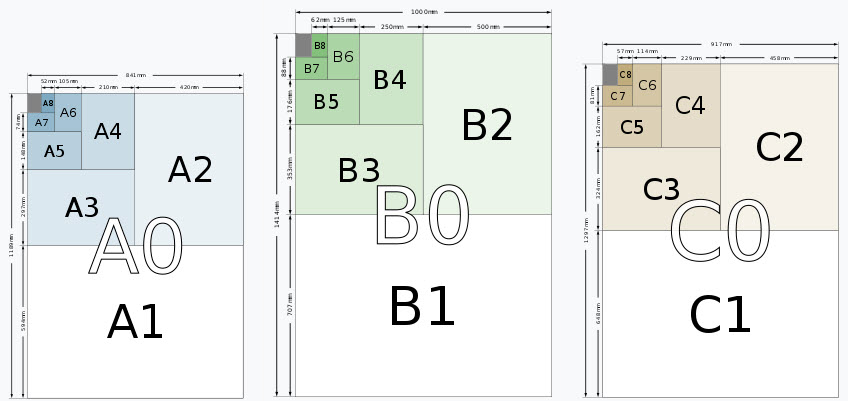
In Australia, the international paper size system is used (also known as ISO 216). This includes the A, B, C and DL size papers. As a general rule, each paper size scales down by half the one above. We will explain a little more below.
The rule of halves
The A series of paper sizes is the most popular, with A4 being your standard page for most notebooks, home printing defaults and copying projects at dimensions of 210mm X 297mm. A0 is the largest at 841mm X 1189mm. From here, each subsequent size is half the previous one when folded, for example A1 would then be 594mm X 841mm.
The B series offers additional paper sizes in between those of the A series and follows the same ‘rule of halves’. B0 starts at 1000 x 1414 mm.
The C series sizes is used as envelopes for A series, beginning at 917 x 1297 mm. These provide similar proportions to A sizes but with a little additional room around the edges for ease of use.
The DL size at 110mm x 220mm is also for envelopes, as it fits A4 neatly when folded in thirds. If you ask for a DL flyer size however, this is slightly different dimensions, generally at 99mm x 210mm so it fits into the corresponding envelope for distribution.This size is popular for projects such as with compliments slips, promotional material and invitations.
What size is best for my project?
Types of projects often have a corresponding paper size common to that application, so start with a little research. The best thing to do is find other printing jobs like yours and take notice of the paper size and quality. For example, posters are often A3 or above for large-scale, striking effect. As mentioned above, invitations and promotional material is often printed on DL flyer size. For general stationery, booklets and even smaller-sized posters, A4 is the go-to.
Visualising these dimensions can be tricky, but it can help to start with a manageable and easily accessible size such as A4 and work up or down from there. Putting two A4 sheets together, for example, will demonstrate the dimensions of A3. Double this to 4 A4 sheets and you have poster-size A2. If you are working on smaller-scale projects, an A4 sheet can be cut or folded so you have a clear idea of how much space you are working with.
If you are unsure what paper sizes will suit your projects, talk to one of Colourtech’s knowledgeable staff for recommendations. You may even decide on completely different custom dimensions!
Other considerations
Before you go ahead and settle on your project dimensions and final paper sizes, there are a couple of important design considerations to note. First and foremost, You need to ensure your print resolution is correct for the size printing; Too low, and your finished image will appear grainy or blurry. This issue can cause big delays in having your project completed, as your printer will need to send it back for corrections. The DPI (dots per inch) needs to be at least 300 - the higher the better when it comes to quality print reproduction. For this reason, print files are often quite large, so you may need guidance on how best to save and share your design if you haven’t worked in large format before.
The other important design consideration is the colour. For real-world printing, you need to use CMYK rather than RGB. This is because RGB has a much greater range of colours, but many of these are not able to be replicated with ink and will be what is called ‘out of gamut’. CMYK ensures all of your design turns out in your expected colours, rather than ending up with a printed design that was not what you intended.
When setting up your page dimensions, you need to leave a margin around the edge of your design known as a ‘bleed’. This area many or may not be shown on the finished product and allows for a small room for error in the final output. The ‘trim’ is the outside edge and important to understand clearly, with design elements placed at least 3mm inside the trim edge to ensure they aren’t lost.
Choosing your paper sizes for your next print jobs does not have to be difficult. There are many options to choose from, but our experts are always here to help should you need some guidance.
To discuss your next print job, call our friendly team on 03 9486 9774 or email sales@colourtechnet.com